DIY reeded end table tutorial
Only one more week until the ORC reveal of our family room makeover! Most of the painting has been done and we are working on finishing up the remaining projects this weekend. Hopefully I'll be decorating and photographing early next week! This week's big project was building an end table. I was very inspired by this photo of a reeded vanity in a design by Katie Rosenfeld and decided to try to DIY it into a side table.  |
| via Katie Rosenfeld |
Thank you to Loloi Rugs for providing product for this project. This post
contains affiliate links for your convenience. As an Amazon Associate, I
earn from qualifying purchases. For more information, see my
disclosure policy.
You might also love...
Materials
-
1x3's
- 1x2's
- 5/16" dowel rods
- 1x12 (we used oak)
- Table saw
- Sand paper
- Kreg pocket hole jig
- 1 1/4" pocket hole screws
- Adjustable c-clamps or Kreg clamps
- 90 degree corner clamps
- Wood glue
- Stain
- Clear top coat
How to build an end table with faux reeded sides
We're actually still working on it, so I will update this post with more photos once it is entirely complete! Here's how to build your own!1. Decide on the size of your table to determine your measurements.
2. Miter the width end of the vertical and horizontal pieces at 45 degrees using 1x3's. These pieces should be angled inwards to create a frame (like a picture frame).
3. Miter lengthwise at 45 degrees on the long edge. This will allow for butting the frames together to form a box.
4. This part is tricky to explain... Lay one of your horizontal pieces and one of your vertical pieces together as if you were starting to put together the frame. Notice that if you were to try to add the adjacent frame at 90 degrees, they would not sit flush unless you cut the corner. Cut these corners at 45 degrees. Be sure to only cut the interior corners.
5. Lay out the pieces face down in corresponding frame formations. Use the Kreg pocket hole jig to add two pocket holes on the angled ends of the horizontal pieces. Screw the horizontal pieces to the angled corner of the vertical pieces. (You may want to put the holes in the vertical pieces instead if you're building a small table. It was difficult to fit the drill in horizontally!) You should now have four "picture frames"
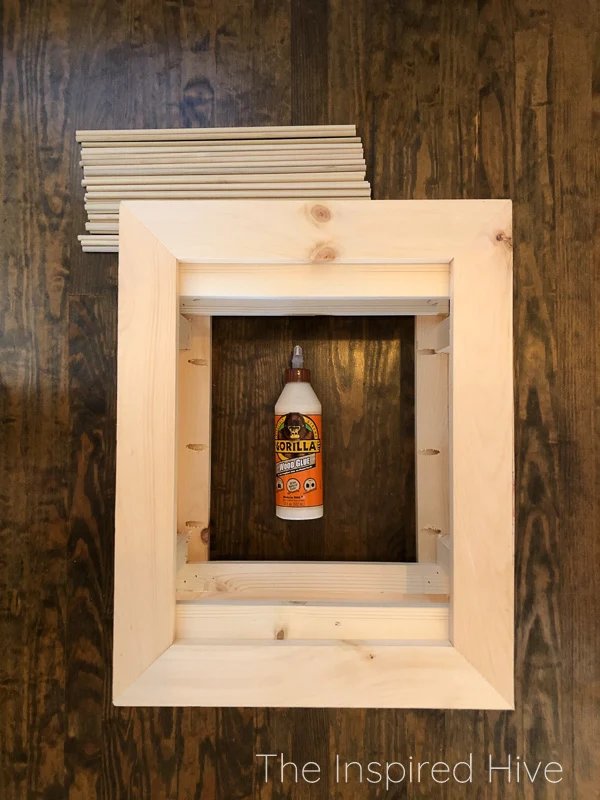
6. Cut and attach 1x2s to the backs of each frame. We used brad nails to attach, but glue or screws is fine too. These pieces will be used later to glue the dowels to. They won't be seen and don't need to be pretty. Be sure that they are offset from the adjacent "picture frame" for ease of putting together.
7. Apply wood glue to the long mitered edges of the frames. Use 90 degree clamps to attach to the adjacent frame. We did this one at a time, allowing the wood glue to dry. Once complete, you should have a freestanding box with nice mitered corners.
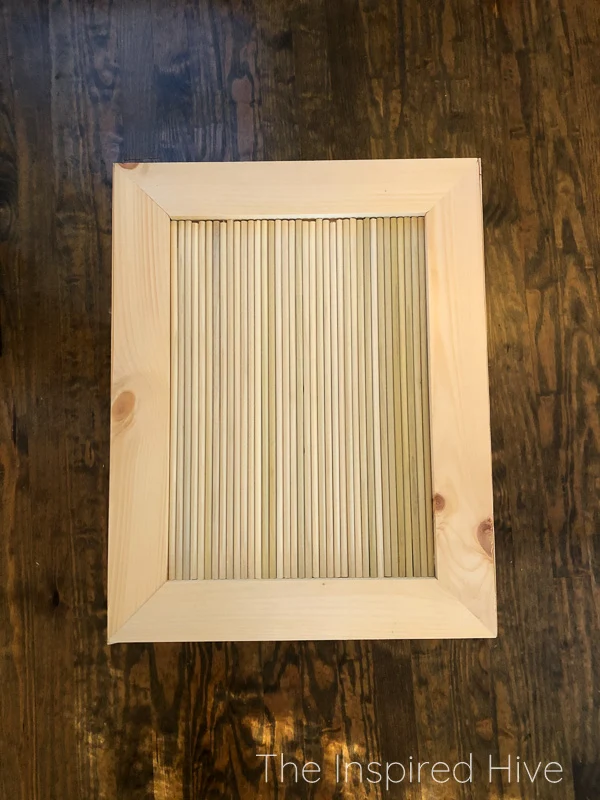
8. Cut dowel rods to fit inside of the picture frames. Apply wood glue (just a thin bead!) to the 1x2 pieces. Carefully fill the frame with dowels. Do one side at a time, allowing the glue time to set before flipping the table to the next side. Some pieces were not perfectly cut- make sure the bottom side is perfectly flush, the top edge won't be noticeable from above if it is an end table height.
9. Cut the tabletop to desired size. Sand the edges to round and smooth them. Use wood glue to attach. (Or you could attach with pocket holes from the inside of the table.)
10. Apply stain in desired color. I used a stain cloth for most of the table and a sponge brush for the dowel rods. Squeeze the stain out of the sponge brush with a gloved hand before applying.
11. Cut mitered dowel rods for the inside edge detail (See below). Stain them. Use a small amount of wood glue to attach.
12. Apply clear top coat.
ORC Task List
We're in crunch time now! Here's what's left on our to do list!Paint the walls- Paint the trim (partially complete!)
Paint the built insChange hardware on the built ins- Paint the stairs (partially complete!)
Paint the balusters- Paint French door
Remove surround sound wiring and patch wallsPaint the entertainment centerBuy new TVand mount it on the wallChange feet on the sofa (decided against this)Paint coffee tableBuild end tableFind desk or cabinet for below stairs/behind sofa (borrowing a piece from my office)Purchase seatingInstall sconces- Layer new rug over old one
- Art and accessories
Don't forget to check out all of the other One Room Challenge spaces!


No comments
Post a Comment