I remember the first time I stepped foot inside of an Ikea store. It was like heaven. I had always been into home decor. As a kid, I loved making my own room decorations, and when I finally got to go to college and decorate my dorm room, it was like a dream come true. And don't even get me started on the magazines... folders and folders full of pictures I had ripped out to save as inspiration (the pre-Pinterest era!). But I had never even heard of Ikea. There were a couple in my state, only a few hours away, but in my small hometown, there was never any talk about it... until college.
I went to college in my home town. It might be a small area, but it is well known for the large, rapidly growing college that's there, and that college has one of the best nursing programs, best business schools, and best educator programs in the entire state. So most of the friends I made were from other parts of the state, closer to the two large metropolitan areas a few hours away. Eventually, a guy I was dating took me home to meet his family and took me on my first trip to Ikea. And I will never forget that day. I was in pure amazement. It must have been torture for him, because I'm pretty sure we spent at least six hours going through every single staged room, opening cabinets and drawers, taking pictures of how they decorated shelves and other things that inspired me. It was a great day in my opinion!
Back then, Ikea was extremely modern in decor style, and my taste was kind of modern/contemporary at the time. So naturally, I became obsessed, and I stocked up over the years. It was not only cute, but it was super affordable for a poor college kid like myself. Well, when I eventually met my future husband, he had a similar stock of poor college kid Ikea furniture. So needless to say, when we moved in together, we had A LOT of Ikea furniture. That black/brown espresso finish was everywhere in our house. Don't get me wrong, I still love Ikea, and I've bought plenty of pieces there recently, but Ikea's decor style has evolved just as mine has, so the more recent purchases fit my current tastes... but all of those old, modern, clean lines and dark pieces I bought almost ten years ago... not so much.
As we've slowly been able to fill our house with grown up furniture over the last few years, we've parted ways with some of the old Ikea pieces. But some of them really do have good bones, good potential, and I can't bring myself to part with them. Part of that reasoning is because I also love a good Ikea hack. Some of my favorites that I've done are our farmhouse style spice racks and our coffee bar. I love to take something that no longer meets my decorating style and transform it into something that does. So, when we made over our guest bedroom recently, that's exactly what I did.
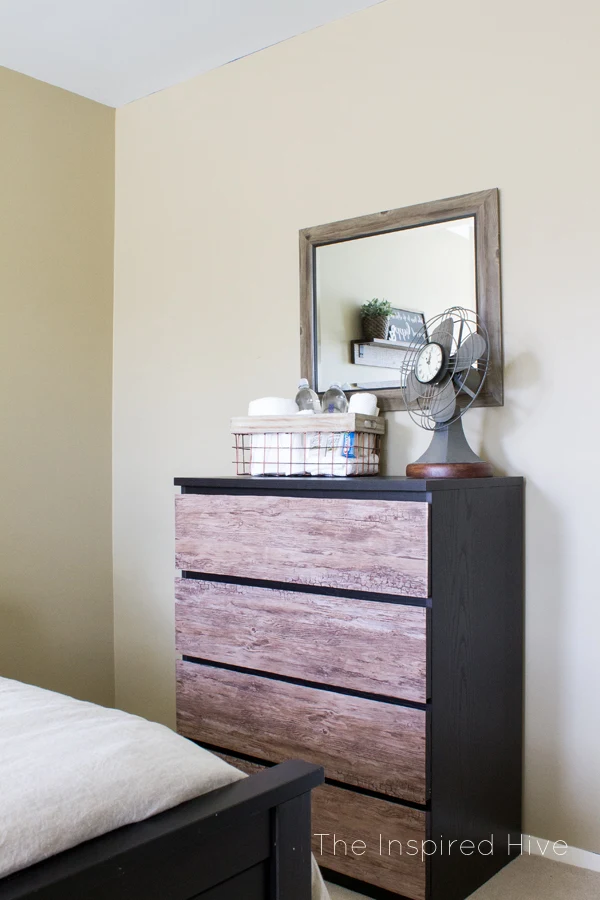
The guest room had an Ikea bedframe, cube shelf, and dresser. We used the bedframe in the room and moved the shelving down to the basement to save for a possible Ikea hack in the future. The dresser, I struggled with. It was way too modern. But I also didn't really want to buy a new dresser when I had one in perfectly good shape. Then it clicked. I could make this dresser look more rustic-industrial in mere minutes!
This post contains affiliate links for your convenience. For more information, see my disclosure policy.
Materials:
- Ikea Malm Dresser (black/brown)
- Rubbing alcohol
- Cotton balls
- Wood grain adhesive vinyl
- Ruler
- Pen
- Scissors
- Credit card or squeegee tool
- X-acto knife
- Hardware (optional)
How to make an Ikea Malm dresser look rustic:
This was such an easy and quick Ikea hack that I didn't even bother taking a bunch of process photos. It should be pretty easy to follow along! Here's what I did...
- Clean the drawer faces with rubbing alcohol using cotton balls. This removes dirt and any oily residues from hands. Don't skip this step! You will be amazed at how dirty those cotton balls become! Drawers are touched all the time. If you want the adhesive paper to stick well, you need to remove all of the gunk and grime!
- Roll out your adhesive vinyl (I chose a rustic wood grain pattern) face down. Measure your drawer fronts, and then measure and mark the vinyl backing for cutting. Remember that it is better to cut the pieces too big than too small. You can cut off excess later.
- Before cutting, double check that the wood grain will be in the right direction. I wanted mine to run horizontally. Use scissors to cut out the measured vinyl.
- Start in a corner and remove a small area of the vinyl backing paper. Line it up with the corner edge of a drawer front. Attach it and smooth it out being careful to line up the edges.
- Continue pulling a small section of paper backing at a time, attaching a few inches of vinyl to the dresser at a time. I found it much easier to move slowly like this rather than removing the entire backing at once and trying to hold up a whole sticky sheet of vinyl.
- Once you have a whole piece attached to the dresser, you'll notice some bubbling under the vinyl. Use a credit card or vinyl squeegee to carefully move the bubbles towards the outer edges, releasing the air.
- Use an X-acto knife to carefully cut off any excess vinyl that's hanging over the edges of the drawer fronts.
- If you want to add knobs or drawer pulls, do so. I actually bought some label pulls that ended up being way too small, but then I decided I liked how it looked without hardware anyway!
Not into the barnwood style of vinyl I chose? Try one of these other woodgrain options instead.
I really love this dresser transformation. It's absolutely perfect for this room and for my current decor tastes. I'm loving dark colors with wood accents lately, so this dresser is now the perfect piece for me!


This is what I needed! I've got the exact same dresser that is now in my daughters room. The only thing I'd do differently is the choice of pattern/color. She loves rainbows so I'd probably go for some funky rainbow colors. Each drawer in different color. Thanks for sharing Nicole :)
ReplyDelete