The Inspired Hive

Inspiration for a creative home

Search

Wedding Wednesday- DIY Seating Cards

Wedding Wednesday | Meet the B's

Hello! Happy Wednesday! Welcome back to week two of Wedding Wednesdays, where I'm finally catching up and sharing some DIY wedding decor ideas :)

For anyone who has planned a wedding in recent years, you know the options for every part of the wedding are endless! Especially now that Pinterest exists. So when you type in something like "wedding seating cards" or "diy escort cards"  or "place cards" you get about ten zillion ideas! It can be overwhelming!

First anniversary gift- Paper

This past Sunday was our first wedding anniversary! You can read more about what Pete and I did and see a peek at our wedding here.

Leading up to our anniversary, we debated whether or not to get each other gifts. I know a lot of people who go all out on anniversaries and lots of people who don't. As a kid, I remember my parents always giving each other a heart-felt card with a long love note written inside and then maybe a gift on bigger anniversaries. I wanted our anniversaries to be special without the focus being on a gift. In the end, we decided to do traditional gifts because it would give us the chance to be a little creative without spending a lot of money.

The traditional wedding gift for a first anniversary is paper (you can see the whole list at Hallmark!). Perfect! What crafty gal can't create a gift out of paper?? But Pete, be afraid of what you might get next year. I'm not too good at sewing and year two is cotton! ;)

I've been wanting to make a sign of our wedding song for a long time but hadn't gotten around to it. I didn't necessarily plan on making it paper, but our anniversary was the perfect opportunity!!

Our first dance was to the Michael Buble version of "The best is yet to come." We had originally chosen another song and actually took a brief dance lesson to attempt to learn a waltz for it, but when we heard this song while listening to Pandora one night, we both changed our minds immediately. It was already close to the wedding when we made the change, so we didn't really get a chance to practice and just had to wing it. I'm pretty sure I laughed the entire time and Pete bit his lip while he concentrated on his moves. We threw in some very incorrect fancy footwork here and there as well as a few spins and dips. It was probably the worst first dance ever, but we had so much fun!! I wish we had it on video! 

First dance

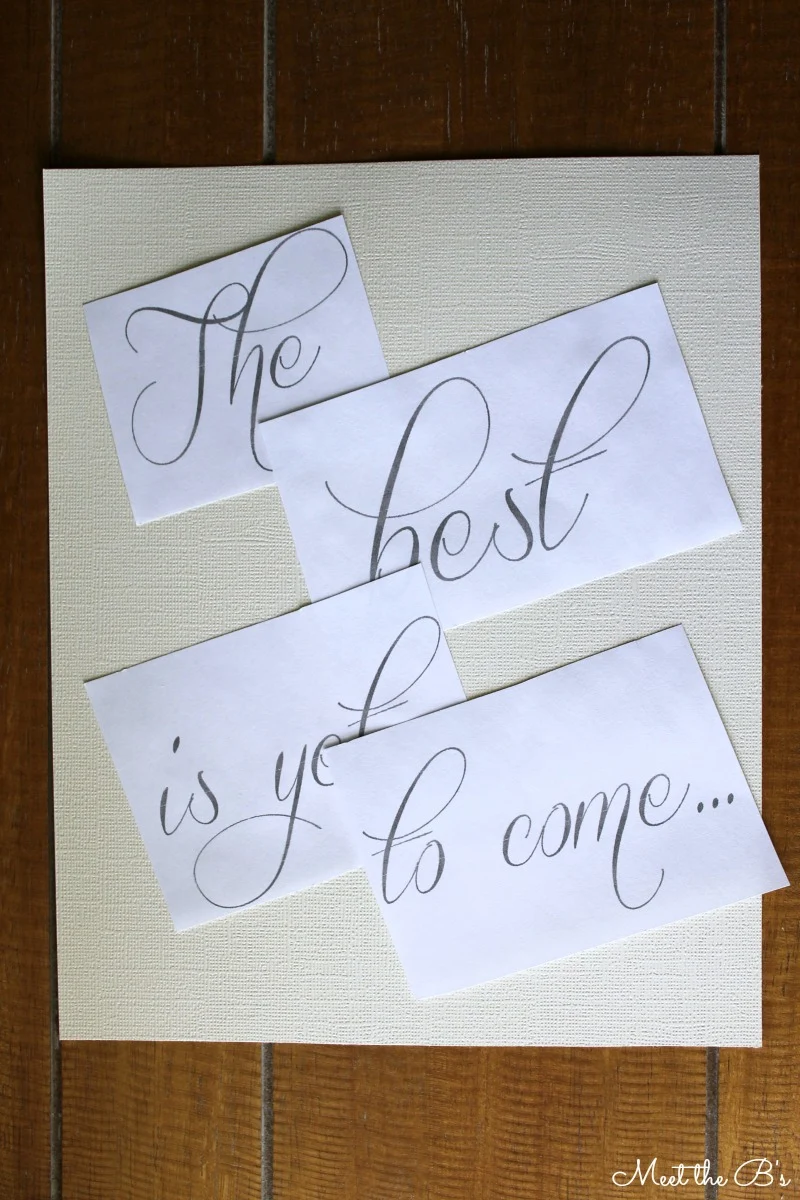
Anyway... back to the gift!!! I spent hours trying to find the perfect romantic font and ended up falling in love with Quickier. I played around with the font size and printed out the words "the best is yet to come." I could have arranged my words on the computer, printed them, and framed it just like that, but that didn't seem quite as fun or as meaningful.

So I cut a piece of textured scrapbook paper to fit in an 8x10 frame.

Paper anniversary gift with wedding song lyrics | Meet the B's

I arranged my text and used my font transfer method to create the word art.

Paper anniversary gift with wedding song lyrics | Meet the B's

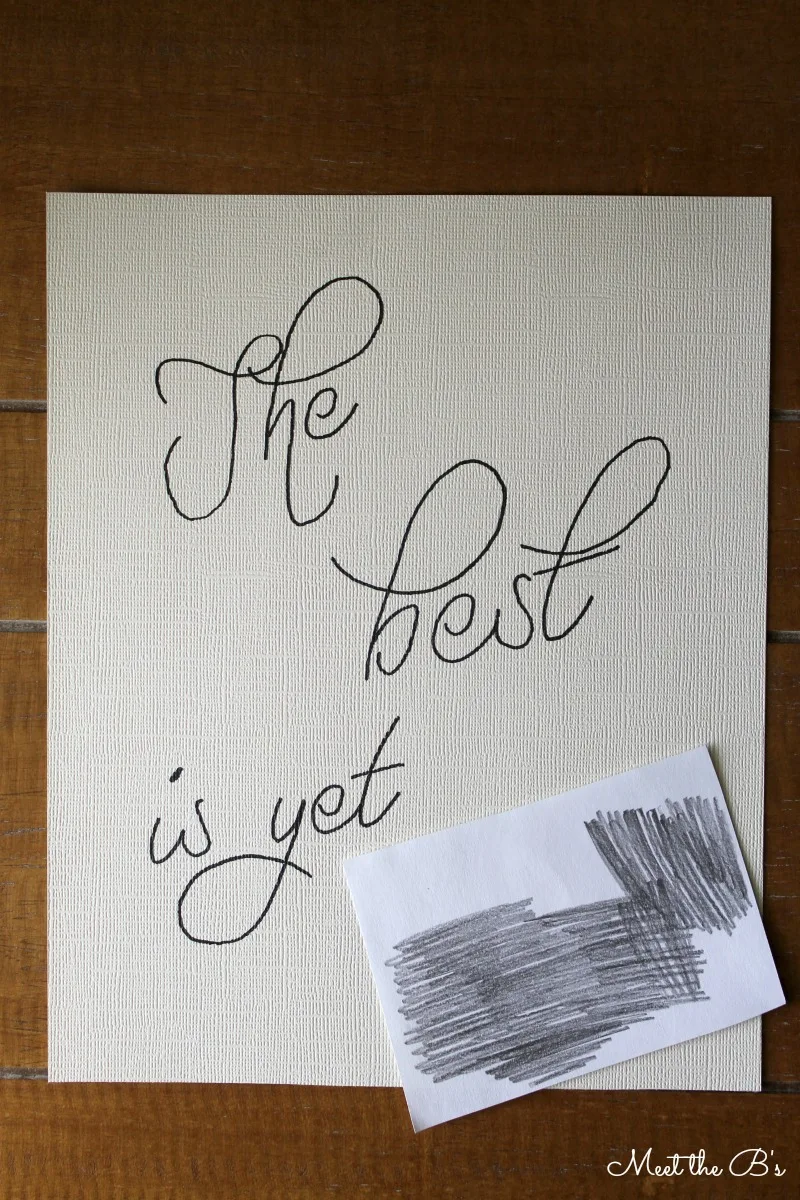
I shaded the back of my printed words with a lead pencil.

Paper anniversary gift with wedding song lyrics | Meet the B's

When the paper is flipped over and traced, the lead should rub off onto the paper, leaving an outline. I then traced the outline with a scrapbooking pen because they have archival ink which means this art will last for years to come!

Paper anniversary gift with wedding song lyrics | Meet the B's

Then I framed it to give to Pete. It's a really simple project, but it's a reminder of the best day ever and a reminder that we have so many good things to enjoy together in the future. 


post signature

Follow me on Pinterest!Follow me on Bloglovin!Follow me on Google+Subscribe via email!Follow me on Facebook!Follow me on Twitter!

Wedding Wednesday- Shabby chic bird house decor

Shabby chic wedding bird house decor | Meet the B's

Welcome to my first Wedding Wednesday!! As I mentioned in my anniversary post, I'm dying to share some wedding crafts with you! I got pretty crafty with our wedding decor with the help of my amazing man, bridesmaids, mom, and mother-in-law. The wedding day has come and gone, but there's no reason the decor can't live on, right?? Hopefully our decor will inspire other brides-to-be who want to DIY their wedding!

Our first wedding anniversary!!

Our wedding | Meet the B's

On July 20, 2013, Pete and I said "I do." It's hard to believe it's already been a year! We've had a pretty busy first year of marriage, so for our anniversary, we decided to just take a simple weekend away to enjoy being together just the two of us. So while you're reading this, we've been hanging out in a beach town all day, enjoying each other's company, and reflecting on that amazing day one year ago. This weekend also celebrates four years since we started dating, so we've got a lot to be excited about :)

Using PicMonkey to organize your desktop

Using PicMonkey to organize your desktop background | Meet the B's

Recently I realized my computer desktop was looking pretty atrocious. Seriously.

Using PicMonkey to organize your desktop background | Meet the B's

I don't even know how it got so cluttered!!! And the background picture is from way back when we decided where to honeymoon! It was time for a little clean up and updating.

I decided to use PicMonkey for this because I love how simple and quick it is. If you haven't tried PicMonkey before, you should! Even if you have fancy photo editing software, this is great when you just need a quick fix.

PicMonkey Photo editing made of win


I started by creating a custom design, but if you have a background you would like to use, you can "edit" that and resize it. Your custom design or resized background should be the same size as your desktop background. To find my screen size, I right clicked my desktop background and clicked screen resolution to find 1366 x 768 pixels. You should be able to find this info wherever you normally change your background photo.

Using PicMonkey to organize your desktop background | Meet the B's

Then I played with the overlays section until I liked my design. You can click "Your Own" to add your blog logo and a photo. Then click the "Geometric" shapes to add sections for each category you need. Hint, if you make the shapes all the same color and then "fade" them each about 10% more than the previous one, you will get an ombre look!

Using PicMonkey to organize your desktop background | Meet the B's

Save your design, then go back to your desktop background settings and load it as "centered." Now you can organize your icons and folders!

Using PicMonkey to organize your desktop background | Meet the B's

Ahhhh, that's much better!!!!
How do you keep your desktop organized?

Did you know you can upgrade your PicMonkey to Royale for only $4.99 a month! This gives you even more great editing options, collage styles, fonts, and overlays!

PicMonkey Photo editing made of win

post signature

Follow me on Pinterest!Follow me on Bloglovin!Follow me on Google+Subscribe via email!Follow me on Facebook!Follow me on Twitter!

DIY Patio Rules Wooden Sign

DIY painted "Patio Rules" sign | Meet the B's
I don't know if you've noticed, but outdoor signs with rules on them are all the rage these days, and for good reason... they're so cute!! Check out some of the inspiration I ran across on Etsy...

Home-iversary!!!

I can't believe we've owned our home for a year already! On July 10, 2013, we sat in a realtor's office and closed on our first home, a mere ten days before our wedding! We didn't actually get to move in until after the honeymoon, but still, to stand among those empty rooms and realize it was all ours was such an incredible feeling! 

Owning a home is something I've daydreamed about for a long long time. I'm obsessed with decorating and organizing and couldn't wait to add my own flair to an empty space. And a year later, I've done just that!
Over the past year, I've realized that all of my spectacular ideas won't happen over night. It will take time to make this place what we want it to be, but we have made it feel like home. I remember when we first moved in, for a while it felt like we were just staying at someone else's house. The yellow paint on the walls and the old dingy floors just weren't us. A few small changes later, and it really started to feel like ours. And now, we've got the downstairs of our home decked out in a way that is perfect for us. It's just so comfortable. It's home. 

We've still got work to do, like decorating the formal living room and painting the entire upstairs, but it's come a long way!!! Here's a few of my favorite shots of our home decor, and in celebration of our own one year home anniversary, I updated the photos on our home tour page to be more current, so be sure to check that out!
Dining room | Meet the B's

Entryway | Meet the B's

Living room | Meet the B's

post signature
Follow me on Pinterest!Follow me on Bloglovin!Follow me on Google+Subscribe via email!Follow me on Facebook!Follow me on Twitter!

DIY Window Box- Part 2

I kinda left you hanging in my windox box tutorial because I hadn't finished painting it and hadn't figured out how to hang it. So today, I'm filling you in on the rest of the details!!

Window box tutorial | Meet the B's

So in my previous post, I left you with a completed wooden box.

Window box tutorial | Meet the B's

To paint it, I followed the same steps as I did with my DIY bar cart, except I didn't prime! I painted the window box before the bar cart and had a really hard time because the cedar picket fence posts are very rough and pourous. I assumed that because the Rustoleum paint had primer in it, it would be fine. However, it took TONS of coats to get it to look decent with a smooth finish and no stains showing through. So I highly recommend using primer first!!! The bar cart went much smoother!

Step 1. Coat with primer. (This picture is from the bar cart since I didn't prime the window box. I highly recommend priming if you are using picket fence posts like I did!)

Window box tutorial | Meet the B's

Step 2. Spray paint. I used Rustoleum's Multi-Purpose paint in "stone grey." You could always use a paint brush for this part too. I just wanted quick and easy!

Step 3. Dry brush with a light grey acrylic paint for a rustic look. To dry brush, dip the very tip of your brush into a small amount of paint. The goal is to not have a wet paint brush. Then very lightly brush your project in the direction of the wood grain.

Window box tutorial | Meet the B's

Step 4. Seal with a weatherproof sealant. I used Rustoleum's.

Window box tutorial | Meet the B's

Next is the fun part. Hanging it! Pete and I did some research and found that we should find the studs under our window and mount to them. Well no matter how we measured, we couldn't find them. And apparently stud finders do not work through aluminum siding. So one day, when I was at work, Pete and my wonderful father decided to just drill straight into the siding without worrying about the studs. And what do you know? It worked just fine! 

Window box tutorial | Meet the B's

We used window box brackets by Hampton Bay from Home Depot to hold up the box. There are weight recommendations on the package. You can always use more brackets if your box is bigger or heavier.

We had to drill extra holes in the brackets to accomodate the size and weight of our box.

Window box tutorial | Meet the B's

Then we drilled pilot holes in the box to line up with the bracket holes. We used nuts and bolts to hold it onto the brackets.

Window box tutorial | Meet the B's

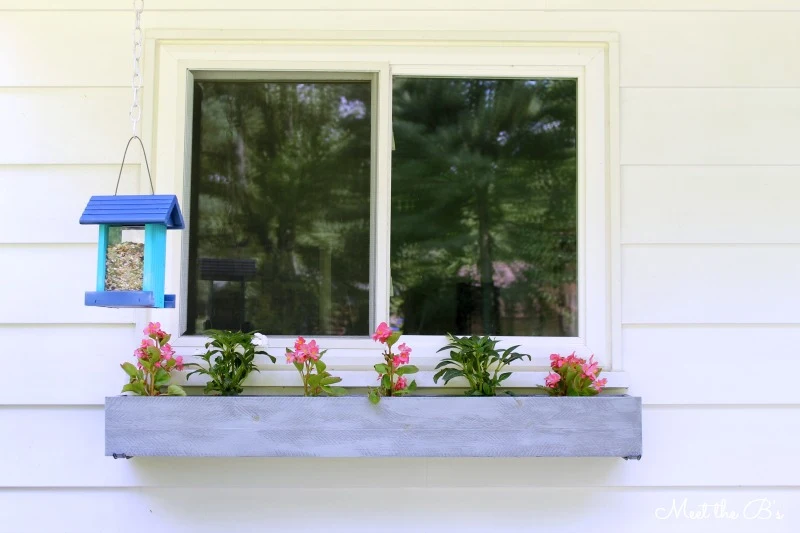
Then I finally got to fill it with pretty flowers!!! 

Window box tutorial | Meet the B's

I love how it turned out! What do you think?

Window box tutorial | Meet the B's

Check out the rest of my outdoor makeover:


post signature
Follow me on Pinterest!Follow me on Bloglovin!Follow me on Google+Subscribe via email!Follow me on Facebook!Follow me on Twitter!

This post may contain affiliate links. Please see my full disclosure policy.