The Inspired Hive

Inspiration for a creative home

Search

Blogging?!?

I've been thinking more and more about this blog lately. Like why am I writing it? What is the point of it? Will anyone even read it? Is it worth spending time on?

So I thought I should just put it all out there. 

I'm the type of person that was collecting home decor magazines from the time I was in high school. As soon as I got my first computer, the hard drive was full of images from Google Image Search of room ideas, color palettes, and DIY projects. Eventually Pinterest came along and opened up new doors. All of a sudden I had somewhere other than my hard drive to save all of these images and an easy way to organize them. It also introduced me to numerous blogs of homes that I dreamed would one day be mine.

Well, now I have my very own home. And I'm not a good writer at all. Or even a good photographer. But I am extremely passionate about decorating, crafting, organizing, DIYing, etc. So this blog is somewhere for me to share my ideas and keep track of the progress of our new home as I finally put all of those years of saved images to good use. And who knows, if they can get past the bad writing, maybe it will spark some ideas for someone else in their own home decor journey. 

I don't have any big dreams that this blog is going to go somewhere. I don't know if anyone will read it or if I'll ever gain any kind of following. But why not give this whole blogging thing a whirl? All of my favorite blogs started out somewhere. I actually went back to the very first post of a blog I've been reading for about five years and noticed that back in the beginning, their blog wasn't so pretty either. It's one of my favorite blogs though and it's popular nationwide, maybe even worldwide. So if they could start off as a simple blog with bad photos and eventually gain a HUGE following just by sharing their decorating ideas, then I can surely post a few bad photos of my own, right? (maybe I'll get that new camera I asked for for Christmas, and then I won't have to cringe at my own photos anymore ;)

For now, my goal is try to make at least one post a week. At the very least, I'll post on each room as I finish it. We'll see how it goes. Any blogging tips are welcome, because this is a journey I have no idea how to embark on!!! :) Wish me luck!

Review of Shur-Line Paint Edger


I'm pretty picky about painting. I hate painting outside the lines... you know, getting paint on the ceiling, the moldings, the floor, anywhere other than where the paint should be. I like crisp clean lines. But I also like to work fast, because really, who wants to spend all day cutting in? 

I usually tape off a room, use a paint brush, and end up cutting in not once, but TWICE to get the previous color not to show through. So when I heard about the Shur-Line paint edger I was eager to try it to see if it would make cutting in go faster, but I was also a little skeptical. I gave it a whirl anyway.

Well the first time I used it, I made a HUGE mess. I almost gave up on the thing. Paint was dripping everywhere. Ugh. But then I watched a lovely little how to video on Youtube, tried again, and had better results. I've used it on three rooms now and I have to say it does get the job done faster. I still use painters tape because if you accidentally get paint on the edge of the Shur-line, it will get on moldings. Better safe than sorry! I do also quickly run a thin brush close to the edge of the tape because the Shur-line just doesn't get close enough to cover up the old color on the edge. But if you're painting over white walls, its probably not that big of a deal. 

So here are the steps I learned to get a nice clean line. 

Dip the edger in the paint. Move it in a circle to fully coat.

Rub the edger around to make sure you got paint on the entire thing, otherwise you end up with splotchy coverage.

Scrape the edger on the edge of your paint tray to rid of all the extra paint. 

Thats it. Start cutting in. Roll the edger back and forth several times for a nice clean line. Tah dah!

I'll continue to post any painting tips and tricks I learn or handy tools I find since I still have a ton of rooms left to paint! Please share any tricks you've found helpful too!


Dining Room Reveal

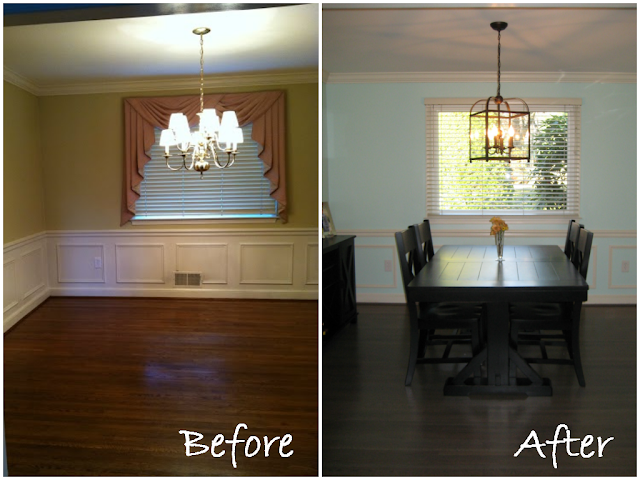
Dining Room Before & After | Meet the B's

I never had a formal dining room growing up. I grew up in Louisiana and most of the homes down there didn't have a separate dining room unless it was a new build or a plantation home. Traditional homes were all about a big eat in kitchen. 

Homes here in Maryland almost always have a dining room. So when we were looking for a house to buy, I was indifferent to the dining room idea and didn't really care much about what our future home's dining room looked like. Once we moved in I realized we should probably invest in some furniture or else we would just have this random empty room. I don't know if we'll ever even use our dining room, but hey, now we can say we have one!


You can see in the before picture above, we inherited some nice drapes, an old school gold light fixture with lamp shades on every bulb, and some classy looking wainscoting. Oh, and of course you can see the floors before we refinished them!


Looks a million times better, just after having the floors redone :)

What to do with this room? We decided to use the same paint color as the kitchen because they share a wall (there's another entrance to the dining room towards the left). I thought the wainscoting could use a little updating, so I taped it all off and painted around it. The drapes came down. A new light fixture went up. We ordered some furniture from World Market (after LOTS and LOTS of searching for the perfect dining table), and voila!


Now we just need to find a window treatment and something to put on the wall on the right side. Shelves or a photo collage maybe? 


Housewarming Party


I absolutely love playing hostess. So when hubby and I decided a couple months ago that we wanted to have a housewarming party, I got super excited. 
Well, we had our party this past weekend, and I think it was a success. Everyone seemed to have fun, the food turned out great, and I had a blast planning it!

First of all, planning a party gave us motivation to get some things done around the house. We finished up the kitchen by hanging some fun artwork. We painted the dining room and bought some dining room furniture (finally!). We painted the office/craft room although we still need more furniture/decor for that room. We set up all of our new living room furniture and found some cute accessories for the room. We did a little yard work. We organized the heck out of the giant piles of boxes we still hadn't unpacked. by the time the party rolled around, the house was looking pretty good. I was impressed with how much we got done so quickly!

When it came to menu planning, I got reallyyyyy excited! I remember a year ago or so seeing an idea for a chili bar on Pinterest. I decided to go with it for our party. Especially because Pete and I LOVE chili. We go to Hard Times Cafe like every other week for chili nachos. Yum. 

So I made three different chilis since I had a handy dandy triple slow cooker we got as a bridal shower gift last spring. I made a Terlingua Texas no-bean chili styled after our favorite Hard Times chili, a traditional turkey chili which I used my aunt's recipe for, and a jalapeno chicken chili. I also set out a tray of chili toppings including cheese, diced tomatoes, jalapenos, onions, and sour cream along with some tortilla chips for those of us who prefer chips to spoons ;)


I made a crockpot mac and cheese which turned out delicious.

I made my secret crab dip recipe. Maybe I'll share one day... 

I made a veggie pizza which a friend gave me the recipe for. There a similar ones on Pinterest though!

We also had chips and dip and a cheese board.

For dessert I made some apple cupcakes which were very moist, super sweet, and delicious.

For beverages, we bought beer, several of our favorite local wines, and I made a spiked apple cider which went over quite well with some of our guests.

Our biggest concern was entertaining people... but it turns out you don't have to do anything special. People love to eat. And people love to talk. We played some music in the background (thanks Pandora!) and just enjoyed mingling. Later in the evening we lit a fire in the firepit and the guys enjoyed hanging out around that. Overall it was a pretty easy going carefree party and I enjoyed every minute of it!
So thankful that all of our friends were able to come out and... warm our house with us :-P 
House-warming??

HOW TO: Chalkboard Art

DIY Chalkboard Art | Meet the B's

I love those chalk typography signs that are everywhere these days. I decided I wanted to put some chalkboard art in the kitchen to tie in our new black table so I found some free printables, printed and framed them (which I'll show off in another post). But I really really wanted a sign that said "Eat, drink, and be merry" because it's one of my favorite quotes and I just thought it would be clever in a kitchen. I couldn't find a free printable anywhere. I did find a photo of a wooden painted sign on Pinterest that I liked, so I decided to DIY it (if anyone knows the original source let me know so I can give them credit for the actual design!). Here's how....

I headed to the craft store and bought some chalkboard paint and a piece of wood (12" x 12"). You can use whatever size/shape you want though. I've done a sign like this previously with a piece of scalloped MDF. 


First, I painted the wood with chalkboard paint. I used three coats because the wood was pretty absorbent. In the past, using MDF, I didn't need so many coats.


I printed a picture of the wooden art I saw on Pinterest. I zoomed to 125% in my printer settings in order to get it to print across two pages. Otherwise it would be too small for the 12" x 12" board. After I printed, I cut the white edges and taped it together. 


Then I colored the entire back of the paper with white chalk (sorry I can't figure out how to rotate that picture!)


Next, I turned my chalky mess over and centered it on the painted board. I traced each letter with a pencil. You want to press down hard so that the chalk transfers to the board.


The image should transfer like this!


Tah dah!


Then I traced the chalked on letters with a white paint pen. I like to put a piece of paper under my hand so I don't smudge the rest of the chalk and lose my outline. 


Comparison. (Again, I don't know why I can't rotate this! The image is saved right side up!)

Next wipe off your board with a damp lint-free cloth. Let dry. Then decide whether you want to fill in your letters with white paint or not. I'm short on time today, so I hung it up as is, but I think I will fill them in sometime soon!